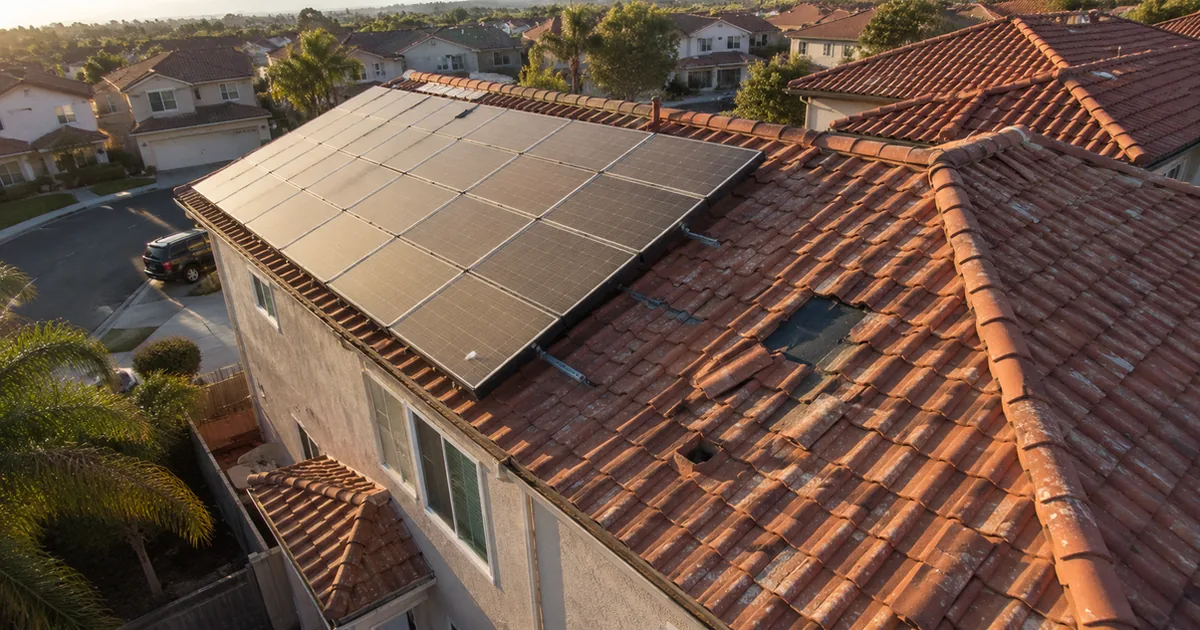
We inspected a two-story stucco home in the Otay Ranch area of Chula Vista last spring. Built around 2001, concrete tile roof, two-car garage, solar array on the south-facing slope. The panels had been bolted on about eight years after the home was built. The seller’s disclosure said “roof replaced never” and “solar owned, not leased.” Both agents treated the solar as a selling point. The buyer liked the electric bill.
Then we put the drone up.
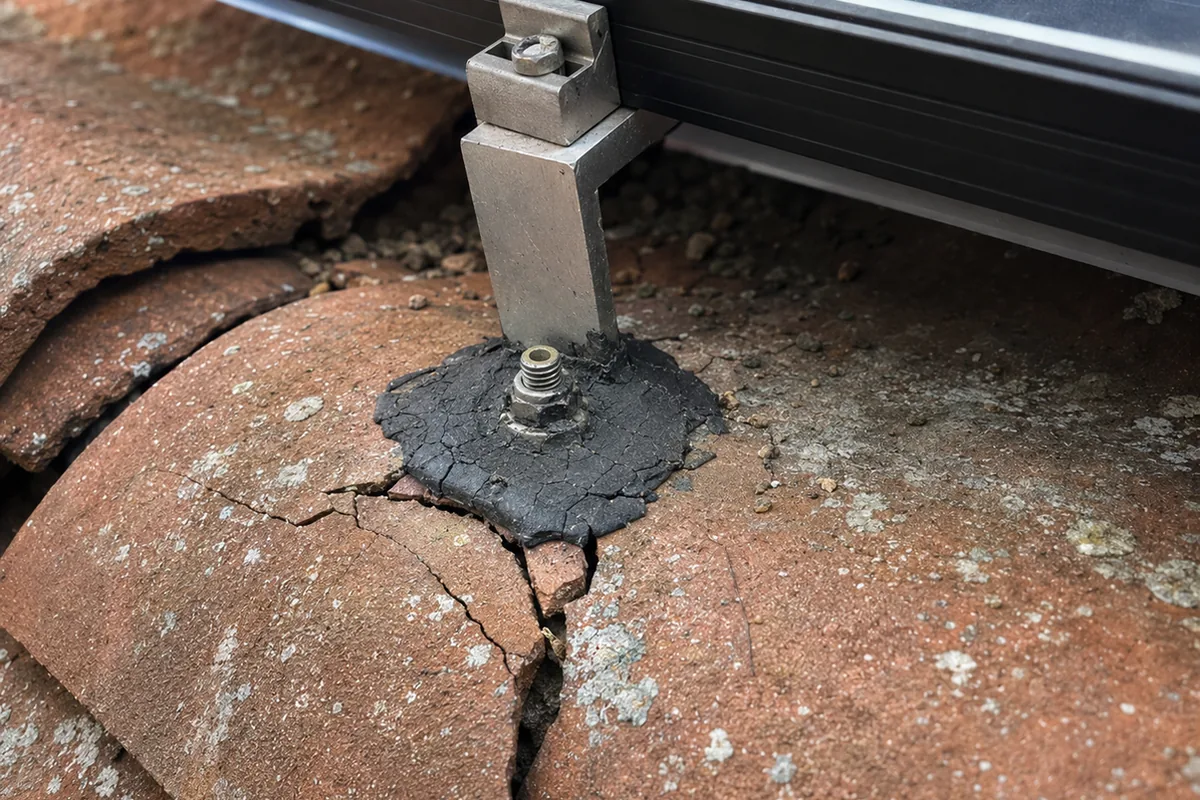
From the ground, the array looked fine. Clean panels, tight rails, no visible sag. From above, it was a different story. Three tiles were cracked at the mounting feet where the lag bolts came through, and every penetration was sealed with a thick bead of roofing mastic instead of proper metal flashing. The mastic had already started to pull away from the tile on the upslope side. One mount had a tile fragment wedged under the rail, holding the panel off-plane by about a quarter inch. That is enough to stress the microinverter connection and enough to tell you the installer broke the tile going in and shimmed it rather than replacing it.
The array was producing power. The roof under it was collecting water at every mount.
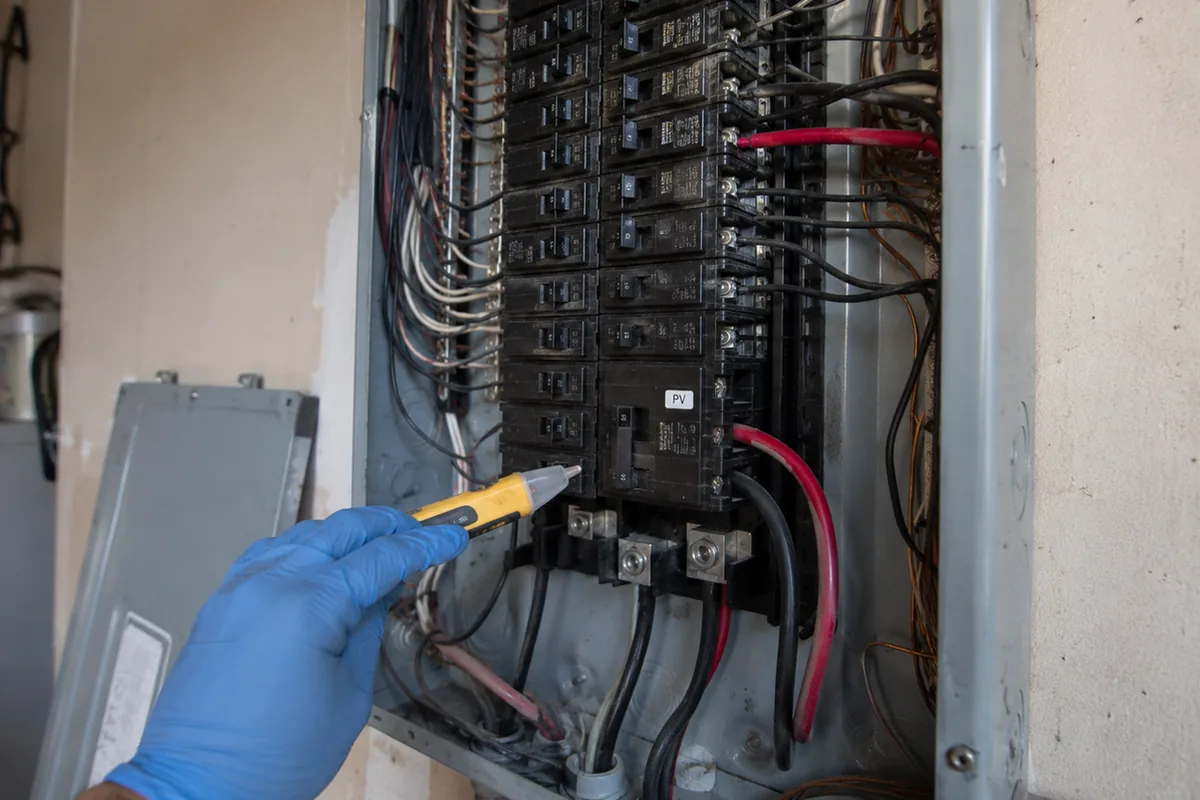
We documented the cracked tiles, the unflashed penetrations, and the mastic failure in the same-day report, with drone stills and a diagram of which mounts were compromised. Then we opened the panel and checked the solar backfeed breaker. It was correctly sized and properly landed on its own breaker, no double-tap, but the main breaker and the backfeed breaker together exceeded the bus rating by 20 amps. That is a code violation the original solar installer should have caught on day one. The buyer’s agent used the report to get a bid for a detach-and-reset, tile replacement, proper flashing at every mount, and a panel upgrade to bring the bus into compliance. The credit came in under the seller’s pain threshold and the deal closed on schedule.
Schedule a Chula Vista inspection · Same-day report · Pay-at-closing available
Why this matters more in Chula Vista than most markets
Chula Vista has one of the highest densities of retrofit solar in San Diego County. The Eastlake and Otay Ranch subdivisions went up in the late 1990s and 2000s, mostly concrete tile roofs on engineered trusses, and the solar boom hit those neighborhoods hard in the 2010s. The result is thousands of tile roofs with arrays bolted on years after the original build, by installers who ranged from careful to careless.
The tile roof is the problem multiplier. On a composition shingle roof, a solar mount is a lag bolt through the sheathing with a flashing boot, and a competent installer can do it without breaking anything. On a concrete tile roof, the installer has to lift tiles, drill through the underlayment into the sheathing, set the mount, flash it, and relay the tiles around the standoff. If they crack the tile, skip the flashing, or use mastic as a shortcut, every mount becomes a potential leak path that hides under the array for years.
Agents who work Chula Vista need to know that the solar array on the roof is not automatically a plus. It can be a liability if the installation damaged the roof, if the electrical tie-in was done wrong, or if the ownership structure complicates the transfer. The same tile-over-time failure pattern shows up in Inland Empire markets too. We documented it in Riverside and Murrieta, but in those cases the tile was failing on its own. In Chula Vista, the solar retrofit accelerates the damage.
How solar installs damage tile roofs
The damage happens at the mount, and it starts on install day. A retrofit solar array on a tile roof requires standoff mounts lag-bolted through the roof deck, with the tiles cut or notched around each standoff. Every mount is a roof penetration that needs proper waterproofing.
Three failure modes show up over and over in our inspections.
Cracked tiles at the mount. Concrete and clay tiles are brittle. The installer lifts them to set the lag bolt, and if the tile is old, sun-baked, or handled roughly, it cracks. A careful crew replaces the broken tile. A rushed crew flips it over, glues it with mastic, or wedges a fragment back and moves on. From the ground, you cannot tell.
Mastic instead of flashing. A proper mount gets a metal flashing boot (sometimes called a comp flashing or a solar jack) that laps under the tile above and over the tile below, creating a shingle-style water path. Mastic, the thick black roofing sealant, is a field shortcut. It works for a few years and then UV and thermal cycling crack it open. Every mount sealed with mastic instead of metal is a future leak.
Underlayment damage at penetrations. The felt or synthetic underlayment under the tile is the real waterproofing layer. When an installer drills through it without properly sealing the penetration, the underlayment tears around the bolt hole over time as the roof moves with heat and wind. The tile above hides it. The leak shows up inside the attic as a stain, or worse, as rot in the sheathing around the mount. On a 20-year-old tile roof, the underlayment may already be near end of life, and a careless solar install punches holes in whatever remains. If you want to understand how tile roofs fail even without solar, the Murrieta underlayment guide walks through that progression.
The electrical side: what goes wrong at the panel
The roof damage gets the attention, but the electrical tie-in is where the safety risk lives. A residential solar array feeds DC power from the panels to an inverter, which converts it to AC and backfeeds it into the home’s electrical panel through a dedicated breaker. When the installation is done right, this is safe and code-compliant. When it is not, there are three findings we see repeatedly.
Backfeed breaker plus main breaker exceeds the bus rating. The NEC 705.12 rule (sometimes called the 120% rule) limits the total amperage feeding a panel’s bus bar. If the main breaker is 200 amps and the bus is rated for 200 amps, the backfeed breaker cannot exceed 40 amps (200 x 1.2 = 240, minus 200 = 40). Installers who do not check the bus rating, or who upsize the array without upsizing the panel, create an overload condition that can overheat the bus bar. We see this in Chula Vista homes where the original 200-amp panel was already near capacity and the solar installer added a 40- or 50-amp backfeed without doing the math.
Double-tapped breakers. A solar backfeed breaker must land on its own dedicated breaker slot at the opposite end of the bus from the main breaker. When the panel is full, some installers double-tap an existing breaker or use a tandem where the bus is not rated for one. That is a code violation and a fire risk, same as the double-tapped and undersized wiring problems that show up in older East County panels.
Missing or non-functional rapid shutdown. California adopted NEC 2017, which requires rapid shutdown at the array level. Older retrofit installs may predate the requirement or may have a rapid shutdown system that was never commissioned. In a fire, this matters: firefighters need to kill the DC voltage on the roof before they can ventilate. If the rapid shutdown does not work, the array is live as long as the sun is up.
Schedule a Chula Vista inspection
Lease vs. owned: the escrow fork that changes everything
Before you negotiate the roof or the electrical findings, you need to know who owns the array. This single question splits the deal into two completely different paths.
Owned system. The seller owns the panels outright. They transfer with the home like any other fixture. The buyer inherits the equipment, the warranty (if any remains), and the responsibility for any repairs. This is the simpler path. The roof and electrical findings go into the standard inspection negotiation, and the seller can authorize a detach-and-reset, a roof repair, or a credit without involving a third party.
Leased or PPA system. The seller does not own the panels. A third-party company (SunRun, Vivint, Tesla/SolarCity, and others) owns the equipment and the seller pays a monthly lease or a per-kilowatt-hour rate under a power purchase agreement. The lease is typically 20 to 25 years. It must be assumed by the buyer or paid off by the seller at closing, and some lease companies charge a transfer fee or require a credit check on the buyer.
Here is where it gets complicated for agents. If the roof under a leased array needs repair, the homeowner cannot just hire a roofer. The lease company owns the panels and must authorize a detach-and-reset, which means their crew pulls the panels, the roofer does the work, and their crew reinstalls. That detach-and-reset costs $3,000 to $8,000 depending on system size and the lease company’s pricing, and the timeline adds two to four weeks. If the seller’s disclosure says “solar lease” and the inspection finds roof damage at the mounts, you are now coordinating three parties (seller, lease company, roofer) inside the escrow timeline.
Check the lease or PPA agreement before the inspection, not after. Know the transfer terms, the remaining balance, the monthly payment, and whether the lease company requires the roof to be in good condition before they will approve a transfer. Some companies will not transfer to a new buyer if the roof needs work, which puts the seller on the hook for the repair before the array can stay.
Red flags during showings
You do not need an inspection to notice the early warning signs. Add these to your walk-through on any Chula Vista home with a solar array, especially in Eastlake, Otay Ranch, Rolling Hills Ranch, and Rancho Del Rey.
- Visible cracked tiles around the array perimeter. If you can see broken tile edges from the driveway, assume there are more under the panels where you cannot see.
- Dark staining on the ceiling or walls of the room directly below the array. Water intrusion at the mounts often shows up as staining before it shows up as an active drip.
- The panel door or the area near the solar disconnect shows corrosion, loose wiring, or burn marks. Any of these is a reason to flag the electrical tie-in for the inspector.
- The seller cannot produce the original installation permit, the interconnection agreement with SDG&E, or the lease/PPA documents. Missing paperwork means you cannot verify whether the install was permitted, whether the system passed inspection, or who owns it.
- The array looks older than the roof. If the tiles are newer and the array hardware is weathered, someone may have re-roofed around the array without a proper detach-and-reset, which means the new underlayment may not be sealed at the mounts.
- No visible rapid shutdown labels. NEC 2017 requires labeling at the service disconnect and at the array. If the labels are missing, the system may predate the requirement or may not have been inspected.
None of these are proof of a defect. All of them are reasons to read the roof and electrical sections of the inspection report with extra care.
The negotiation playbook when solar roof damage surfaces in escrow
Four paths cover most of these deals. Knowing them ahead of the contingency deadline helps you steer.
Detach-reset-repair, seller pays before closing. The cleanest outcome. The lease or ownership holder authorizes the panel removal, a licensed roofer replaces the cracked tiles and installs proper flashing at every mount, and the solar company reinstalls the array. Insist on a re-inspection before closing to verify the work. This path adds three to five weeks and costs the seller $5,000 to $15,000 depending on the scope, so it is the least common.
Seller credits the buyer to handle it after closing. The most common path for owned systems. Size the credit to a written bid from a licensed roofer, plus the detach-and-reset cost if the panels have to come off. Get two bids if you can. The credit should also cover the electrical panel upgrade if the bus rating violation is confirmed. This follows the same negotiation structure as the plumbing credits in older homes.
Seller pays off the lease and the buyer gets a clean roof repair. If the system is leased, the seller can sometimes pay off the remaining lease balance and transfer ownership to the buyer at closing. This removes the lease company from the repair equation and lets the buyer manage the detach-and-reset on their own schedule. The payoff amount is often $10,000 to $20,000 on a mid-life lease, so this only works when the seller has the equity.
Buyer walks under the inspection contingency. This happens when the roof damage is extensive, the electrical findings are serious, and the lease complicates the fix. The earnest money is protected. Your job as the buyer’s agent is to make sure they understand the total cost of the repair, the lease assumption, and the timeline before they decide.
How the inspection actually catches it
A ground-level visual inspection cannot see the mounts under the array. That is why we fly every solar roof with a drone as part of our standard inspection scope. The drone gives us a direct overhead view of the tile condition at each mount, the flashing (or lack of it), the mastic, and the rail alignment. We are looking for cracked tiles, displaced tiles, failed sealant, and any mounting hardware that has shifted or lifted.
Inside, we check the electrical panel for the backfeed breaker, verify the bus rating math, look for double-tapped connections, and confirm that the rapid shutdown labeling and function are present. We run thermal imaging on the panel under load, because an overloaded bus bar or a loose backfeed connection runs hot before it fails visibly.
The attic gets checked too. We look at the underside of the sheathing in the area directly below the array for water staining, rot, or daylight at the penetrations. A stain in the attic under a solar mount is a more reliable indicator than anything you can see from outside.
Combined, the drone, the panel check, and the attic tell the full story. The same-day report gives the buyer’s agent the documentation to price the repair and negotiate before the contingency expires. We use the same thorough approach across South County: San Diego, La Mesa, and National City all get the same scope.
Quick FAQ for buyers and agents
Do solar panels damage every tile roof? No. A properly installed array with correct flashing, unbroken tiles, and a bus-compliant electrical tie-in is fine. The damage comes from careless installation, skipped flashing, and broken tiles that were never replaced. The quality of the install matters more than the presence of the panels.
How much does a detach-and-reset cost? Typically $3,000 to $8,000 depending on the number of panels and who does the work. If the system is leased, the lease company usually requires their own crew, and pricing varies by company.
Can you inspect the roof without removing the panels? We can see a lot with the drone: cracked tiles at the perimeter, mastic failure, shifted mounts, and rail misalignment. We cannot see every square inch under the center of the array without a detach. If the drone findings suggest widespread damage, we recommend a detach inspection with a licensed roofer before the contingency expires.
What is the 120% rule? NEC Section 705.12 limits the combined amperage feeding a panel’s bus bar to 120% of the bus rating. If the main breaker plus the solar backfeed breaker exceed that limit, the panel needs to be upgraded. This is one of the most common solar electrical findings in homes where the array was added to an existing panel.
Does a solar lease transfer automatically? No. The buyer must be approved by the lease company, and some companies charge a transfer fee or require a credit check. Read the lease agreement before the inspection, not after, so you know the terms.
Is this common in Chula Vista specifically? Yes. The combination of 1990s-2000s tile roofs and a dense solar retrofit market makes Chula Vista, especially Eastlake and Otay Ranch, one of the areas where we see this pattern most often in San Diego County. The 5 things sellers should fix before listing guide covers this from the seller’s side.
The honest summary for agents
If you work Chula Vista and you list or write offers on homes with retrofit solar, the roof under the array is the inspection finding that changes the deal. The cases caught during the contingency are negotiations. The cases caught after closing, when the first winter rain comes through a cracked tile at a mount, are callbacks and lawsuits.
The inspection that finds it is not the one that looks at the panels from the driveway and checks the breaker box. It is the one that flies the roof, reads the mounts, checks the bus math, and looks at the attic below. Same-day report, same-day proof, before the contingency clock runs out.
Schedule a Chula Vista inspection or see our full inspection scope before you book. Want to see what the finished report looks like? Here is a sample inspection report. Common questions are answered in the FAQ.
Related reading
- Chula Vista polybutylene piping guide — the gray supply pipe hiding in the city’s late-1980s and early-1990s EastLake and Rancho del Rey tracts
- Riverside tile roof underlayment guide — tile roofs failing under perfect-looking tile, the same pattern solar installs accelerate
- Murrieta tile roof underlayment guide — the underlayment failure that hides under Inland Empire tile roofs
- El Cajon aluminum wiring guide — the electrical hazard in older East County homes, and the escrow playbook when it surfaces
- Pasadena galvanized and cast iron plumbing guide — hidden plumbing hazards in older California homes
- Why infrared scanning matters in California homes — how thermal imaging catches hot connections and overloaded panels
- How to read a home inspection report in California — what buyers and agents should focus on in the report
- 5 things San Diego sellers should fix before listing — the seller-side view of findings like solar roof damage
We also inspect across South County and San Diego: San Diego, La Mesa, National City, Coronado, and Imperial Beach. Same scope, same same-day report.
Book a Chula Vista home inspection or schedule directly · Same-day report · Pay-at-closing available · See what is in the box on our sample report page